Drawing 5z_boyjkm98= Dragon can seem overwhelming, but breaking it down into simple steps makes the process manageable and enjoyable. Whether you are a beginner or an experienced artist, following a step-by-step method ensures that every part of your dragon looks cohesive and well-proportioned.
Table of Contents
Sketching the Basic Structure
Start by sketching the basic structure of your dragon using simple shapes. The head can be a circle, the body an oval, and the wings can be represented by triangles. This stage is crucial as it establishes the foundation of your dragon’s proportions.
- Outline the Dragon’s Head and Body:
Draw a circle for the head and an elongated oval for the body. Make sure the body is proportional to the head—dragons typically have long, sleek bodies, but depending on your vision, you can adjust the size and shape accordingly. - Position the Limbs and Tail:
Use light lines to sketch where the legs and tail will be. For the legs, you can draw small ovals for the joints and lines for the limbs. The tail can extend gracefully from the lower part of the body and should taper as it reaches the end. - Add Wing Guidelines:
Wings are a defining feature of many dragons. Draw two large triangles emerging from the back, where the shoulders would be. The wings can be adjusted for various positions, such as spread out for flight or folded back if your dragon is resting.
Once you have the basic structure in place, you’ll have a skeleton to build upon, ensuring your dragon has a well-balanced, dynamic pose.
Refining the Sketch
After establishing the basic structure, it’s time to refine the sketch by adding more intricate details. At this point, your dragon should start taking shape.
- Define the Head and Face:
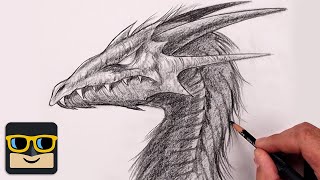
Add features such as eyes, nostrils, and a mouth. For the Drawing: 5z_boyjkm98= Dragon, consider giving it fierce, slanted eyes to convey a sense of power. Horns can be added for extra character. Draw the jawline to indicate the dragon’s ferocity or wisdom, depending on the expression you want. - Detail the Limbs and Tail:
Add muscle definition to the limbs and enhance the claws. The tail can have additional features like spikes or fins. At this stage, pay attention to proportion adjustments to ensure the Drawing: 5z_boyjkm98= Dragon body feels balanced. - Shape the Wings:
Refine the wings by adding curves to represent the wing membranes, which are often leathery and textured. You can also add veins or bones within the wings to enhance the realism.
Take time during this stage to adjust any proportions or make small changes. Your sketch should start to look more like a Drawing: 5z_boyjkm98= Dragon at this point, with recognizable features and a clearer pose.
Techniques for Texturing and Shading
Texture and shading are key elements that make your Drawing: 5z_boyjkm98= Dragon appear more lifelike. Without proper texturing and shading, even the most well-proportioned dragons can appear flat and dull. This section will cover techniques to add depth, detail, and texture to your dragon.
Adding Realism Through Scales and Skin Texture
One of the most defining characteristics of a Drawing: 5z_boyjkm98= Dragon is its textured skin, often represented by scales or armor-like plates. To give your dragon a realistic look, start with the following steps:
- Draw the Scales:
Scales can vary in size depending on the Drawing: 5z_boyjkm98= Dragon anatomy. On the head and limbs, the scales are typically smaller and closer together, while on the body and tail, they tend to be larger. Use small, U-shaped curves to draw scales across the dragon’s body. Overlap them slightly to create a natural flow. - Armor Plating (if applicable):
If you want your Drawing: 5z_boyjkm98= Dragon to have an armored look, you can create segmented plates along its back or chest. Use straight lines with slight curves to form rectangular or hexagonal plates. These plates should look solid and protective, giving the dragon a powerful appearance. - Incorporating Wrinkles and Folds:
Add subtle lines to indicate wrinkles where the dragon’s skin folds, especially around the neck, joints, and wings. These details give the skin a more realistic appearance, making it look flexible and alive.
Mastering Shadows and Highlights
Shading is essential for adding depth and dimension to your Drawing: 5z_boyjkm98= Dragonn. Correct shading can transform a flat drawing into a three-dimensional masterpiece. Here’s how to approach shading:
- Determine the Light Source:
Before you start shading, decide where the light is coming from. This will determine where the shadows fall. For example, if the light source is from the top right, the shadows should be on the lower left of the dragon’s body. - Layer Your Shading:
Start with light shading and gradually build up darker layers. Use a softer pencil (like a 4B or 6B) for darker shadows. Focus on areas under the wings, belly, and limbs where light would naturally be blocked. - Blend for Smooth Transitions:
Use blending tools like tissue paper or blending stumps to smooth out the shading. This will create a soft transition between light and dark areas, making the Drawing: 5z_boyjkm98= Dragonn appear more three-dimensional. - Add Highlights:
To make certain areas pop, use an eraser to create highlights on the dragon’s scales, horns, or eyes. These highlights should be placed in areas that catch the most light, such as the top of the head or along the wings.
Expert Tip: Don’t be afraid to experiment with shading. Shadows can create mood and depth in your dragon drawing, giving it a more realistic or mystical feel.
Coloring Your Drawing: 5z_boyjkm98= Dragon
Once the sketch is refined and shading is complete, it’s time to bring your Drawing: 5z_boyjkm98= Dragon to life with color. Adding color not only enhances the visual appeal but also allows you to convey the dragon’s personality, whether it’s fiery and aggressive or cool and mystical.
Choosing the Right Color Palette
The color scheme you choose will greatly influence how viewers perceive your dragon. Some common color palettes include:
- Fiery Dragons:
Red, orange, and gold tones are perfect for Drawing: 5z_boyjkm98= Dragonthat breathe fire or are associated with strength and dominance. Start with a base layer of red or orange and gradually build up the color intensity using darker shades for shadows. - Mystical Dragons:
Blue, purple, and green are great for creating a more mystical, magical vibe. Cool colors like these can make the Drawing: 5z_boyjkm98= Dragon appear calm yet powerful. You can blend different shades of blue or green for a shimmering effect, perfect for a dragon that lives near water or in the sky. - Traditional Dragons:
Classic dragon colors such as dark green, brown, or black give a grounded, earthy look. These colors can make the dragon feel ancient and wise. Use these tones for Drawing: 5z_boyjkm98= Dragon that reside in forests or mountains.
conclusion
creating your 5z_boyjkm98= Dragon is a rewarding artistic journey that combines technique, creativity, and practice. From gathering the right materials and sketching the basic structure to refining the details, adding textures, and mastering shading, each step allows you to breathe life into your dragon. Whether you draw inspiration from mythology, modern media, or your imagination, the process of bringing a dragon to life on paper or digitally is both a technical challenge and a creative expression. Keep practicing, experimenting, and most importantly, enjoy the process of mastering dragon art!
Read More cute:-_noi7qvbwi= bat